Showing posts with label DIY. Show all posts

Friday, February 15

DIY: How to Clean White Sneakers


So if you've been around here for a while, you know that Tom is extremely tall. With being tall comes huge feet, obviously. That's why these shoes are so big, they're a 15. We have such a hard time finding him shoes that he actually likes, so I decided to retrieve an old pair that he loves from the trunk of our car (I have no idea why they were back there) and make them new again instead of buying new shoes altogether. 


After I did one shoe, I decided to document the process because I thought they came out so well!

Here's what you'll need:


1. New shoe laces
2. Fabric paint (any craft store should have this)
3. Shoe Whitener (I picked this up at Target)
4. A paint brush!

What to do:

1. Take out the gross shoe laces and throw them away!
2. Clean the shoes (I used a Mr. Clean Magic Eraser--those things are the bomb--haha remember when it was cool to say "the bomb"?). Dry them with a paper towel.
3. Apply the Shoe whitener all over the top of the shoe. Do a second coat on any spots that need it. Let it dry.
4. Apply a thin coat of the white fabric paint on stubborn areas--in seams, over the rubber sole that shows on the sides, etc. If you make sure to do a thin coat it's not going to show up at all! This stuff is amazing for shoes and I never would've thought of using it on them (...until I did, haha)
5. Add the new laces.
6. You can thank me later!


xo

Thursday, December 20

DIY Studded Purse


I've been into the whole stud trend lately. I think it's pretty adorable. I got this cute little pink messenger bag to carry the essentials for Carter when we're out shopping--one diaper, some wipes, and epi pens, plus--duh--my debit card and a chapstick. I got sick of the whole diaper bag thing--way too big and annoying for frequent trips in and out of the car. Plus after the infant stage a full diaper bag really isn't that necessary (in my opinion, anyway).

Well, my point is, I got it on clearance at DSW for a steal, but it was lacking something. I decided to make it a little more fun!


Find the Jewel-It glue here


Monday, September 17

Guest Post: Carly's DIY Cosmetics

So today we're going to learn how to make some DIY cosmetics. Are you excited? Because I am.  I kind of very much like to do that. Like the time I made my own salt scrub

Here's Carly with three awesome DIY cosmetic tutorials. 


*  *  *  *  *  *

DIY Cosmetics You Will Never Buy Again

Here's a fun fact for all you fashionistas out there: the average woman will spend over $13,000 on makeup in her lifetime. That's over $180 each year - and isn't that money better spent on something useful, like shoes?

Fortunately, you can make many beauty products at home using only items you have in your kitchen. Add a couple of specialty products you can easily snag at a natural foods store or online, and you'll be whipping up your own beauty remedies for far less money in no time. Here are a few easy recipes you can make today:

1. Easy DIY Makeup Removal Wipes. Have you seen how expensive makeup remover is? On the other hand, have you ever tried to take off waterproof mascara without it? They're a necessary evil, like Spanx. Make your own simply and easily by grabbing a plastic container, a roll of paper towels, a pair of scissors and some common kitchen ingredients. First, cut the roll of paper towels in half (you want to wind up with a short-looking roll of paper towels, not a tall, skinny horseshoe shape). Pop them in the plastic container, then dump 4 cups of distilled water, 2 tsp. of coconut oil and a squirt of two of your favorite face wash on top. Seal the container and use when you want to go au naturale.

2. Oil for Everything. Wondering how to improve your beauty regimen quickly and easily? Chances are, there's an oil for that! Vegetable oil and coconut oil make amazing - and simple - hair conditioners. Simply apply some to the ends of your hair after your shower and go! For a leave-in conditioner, apply your oil of choice to your scalp and massage. Comb through your locks and let it sit for a couple hours (just enough time for a mini-marathon of your favorite TV show!), then rinse.

Another excellent oil is tea tree oil - in fact, no beauty routine should be complete without it! Use a drop or two in your usual shampoo to clarify your hair and get rid of dandruff. Rub a drop onto any skin blemishes and watch them disappear like magic!

3. Fresh-Faced Scrub. Yogurt and honey are two amazing foods that you can use on your skin to feel fresh and look great. If you're battling a breakout, try crushing up a few uncoated aspirin, then add 2 tablespoons each of honey and yogurt. Apply to your skin, let it sit for a few minutes, then rinse off. Combat dry skin by mixing a couple of tab\lespoons of cooked oatmeal with a tablespoon each of yogurt and honey. Let it cool a bit, though applying it to your face warm is heavenly.

Making beauty products at home is incredibly simple and can save you tons of money. Why not use things you already have around the home to create your own unique beauty blends? You can customize your favorite recipes to make something personalized for your particular needs - what big beauty company can promise that?

About the Author

Carly Lance is a blog coordinator for Personal Bankruptcy Canada, a company that helps “good people with bad debt. Frugal may be her middle name, but Carly does it with class – which is why she loves to write about saving money, to help others learn from her cheap (but classy!) ways.

Monday, August 27

Felt Flower Tutorial + GIVEAWAY!! (3 WINNERS!)


So guys, I NEED to introduce you to this lovely lady, Jodi. She owns a shop called Mia and Mackie in the Mirror. She makes lovely hair clips and flower headbands perfect for newborns and little girls! She also has ADORABLE Baby Cakes Gift Baskets  for new little boys too! She also raises money for the Danny Did Foundation by selling these precious bottle cap necklaces made by her daughters and nieces. Read more about it here


*  *  *  *  *  *  *  *  *  *  * 

Hi, my name is Jodi and I am a wife to a handsome and hard working husband Matthew, a mother to two very intelligent little girls, both with very strong personalities, Mia (6) and Makenna (3) and an artist. I create unique, one-of-a-kind hair candy for all ages, hand painted furniture,  and a lot of other fun personalized gifts.

While growing up I was always drawn to arts and crafts. I was surrounded by artists, from my mother, to my grandfather, brothers and cousins, everyone had their own niche in the art world.  To this day my cousins are still heavy involved in the art community, my mother is still a brilliant painter and poet, and my grandfather's sculptures carry his legacy.

After I had my first little girl Mia, in December of 2005,  I found that all the headbands I put on her head would leave indentations on her fragile skin and all the clips were too heavy for her fine hair. I started by dissecting store bought bows and attaching them to soft cotton headbands, and soon after I bought my own ribbon and fabric and got to work.  And thus, my company was born but still unnamed, until one day I was brainstorming with my mom, and baby Mia crawled over to her mirror and started to kiss herself as she so often did, it was a no brainer, Mia in the Mirror it was!.

Shortly before Mia was eight months old, I met with a hip baby boutique in one of the trendiest areas of Chicago, and was pleasantly surprised when they placed an order and put my products up for sale in their store.  And it didn't stop there, I went to a few boutiques around the North Suburbs where I'm from and they too took orders and put my products in their store as well. Since then I have done dozens of art shows, charity events and had my products selling in boutique's and hair salons across the Chicagoland area.

In 2009 baby Makenna graced us with her presence and of course she needed to be added to the name of my company, Mia and Mackie in the Mirror. I love having two girls to dress up, and for the time being, they love it too.

My company is not just a business, it is a passion. I put great effort into each piece I create, it takes time to make things just right. My motto is that every princess deserves to be the fairest of all, therefore every piece I create should be fit for a princess.


Materials Needed
*Felt
*Scissors
*Something Circular to trace (cup, vase, or in this case the cardboard used to protect the icing in a cinnamon roll package...yumm!)
*glue gun/ glue stick
*around 4.5 inches of 3/8 inch grosgrain ribbon
*alligator clip (any beauty supply store will have them and if you buy a big box you will save yourself $)

STEP ONE: Start by folding your felt so that you can fit your circle three times across. You want six circles when you are done cutting. **Trick, if you press down hard enough with your circle you will get an indentation that you can easily trace your scissors with, no need to draw on your felt! 


STEP TWO : Cut your circles, you will need five for your petals and one to use as a base.  


STEP THREE: Take one circle and fold it in half 


STEP FOUR:  Fold the circle in half again, but before you do put a dab of glue down


It should turn out something like this, I think it looks like a fortune cookie...yumm! 


STEP FIVE: Do this with five of your cut out circles, remembering to leave one just the way it is.


STEP SIX: Put a dab of glue in the middle of your "left alone" circle and place one of your fortune cookies down like so


STEP SEVEN: Continue to do it with three more fortune cookies. It should look something like this.


STEP EIGHT: Put one more dab of glue in the middle and place your last fortune cookie on top.


And Voila -- you are done with your flower!


Now to line that alligator clip!

Cut your ribbon around 4.5 inches, it should be good, I am going to let you all in on a little secret --- I never measure anything, Yep that's right, I craft without measuring!

I always slide my ribbon in place before I glue, like so. Once it is all lined up place a small line of glue on the ribbon that is in between the prongs of the clip.


Bring up the ribbon around the glue and press for a few seconds.


Finish gluing the ribbon down along the rest of the clip


Add a little glue the  top portion of the clip, place your flower down and you have yourself an easy DIY felt flower hair pretty!


*  *  *  *  *  *  *  *  *  *  * 

It's time to give this beautiful headband/clip set away along with two other prizes: a $15 shop credit and a 50% off voucher for any (one) item!!

a Rafflecopter giveaway

Wednesday, August 15

DIY: Make Your Own Salt Scrub

Hey Lovelies.

So today I thought I'd share a quick little DIY that I did last week. I wanted to make a gift for my mom's birthday (in addition to her "real" gift, which cannot be named because she didn't get it yet!)

First of all, I have to give credit to my sister-in-law, Melissa, because she made her own first and I stole her idea. She told me the recipe she used, but I forgot (as usual when anyone tells me a recipe for anything) so I made this one up.

What you'll need:


1. oil of some kind. I used canola because it was cheap and easy to find in the store (gotta be quick when you're out with a toddler who'd rather run wild than sit in a cart)
2. coarse salt
3. a cute jar

These are the 3 basic ingredients you'll need for the scrub I added a bit more to make it more fun:

1. coconut oil (you can't go wrong with adding some of this. it feels SO good on your hands and gives the scrub a light coconut scent. the more coconut oil you add, the more solid the scrub will become at room temperature. this could be a good or a bad thing depending on what you want)
2. sea salt (I added a bit of this because it was coarser than the kosher salt. I like to mix things up)
3. food coloring (my mom's favorite color is purple so I wanted to make it purple, duh)
4. fragrance (I used some Lavanila Laboratories pure vanilla perfume to give the scrub a vanilla coconut scent). I had a bunch of testers free from one of my {million} Sephora purchases so I was fine with sparing one.

The Deets:

Mix the oil and the salt in a large bowl. Make sure that the mixture is thick (but not too thick that there's hardly any oil). If you're going to add coconut oil, you'll probably want to heat a bit in the microwave first so that you can add it when it is liquid and make sure it gets mixed in with the rest of the scrub.

Add the food coloring before putting the mixture in a jar. You want to mix it well and give it time to sit. At first it will look like only the salt is getting color, but eventually the whole mixture will take on the color of the food coloring. I'd also do this with only about half the salt/oil you're going to use so that you can lighten it up if you add too much. 4-6 drops should be enough for a 16oz jar.

Add the mixture to the jar and make it pretty. That's it!


Wednesday, August 8

Make Your Own Dryer Sheets!

For the longest of times I have wanted a truly natural dryer sheet. All I want is a little scent on my clothes without getting all hivey and rashy--is that too much to ask? I've even tried the natural brands, and still--torture.

I came across this tutorial recently and thought I'd share the link. The basic idea is that you take muslin cloth + 2 drops of essential oil and BAM, you have yourself a dryer sheet. 

I'm going to be purchasing some fun fragrances here to play around with.

This is may be the simplest DIY ever. That's how I like things.

P.S. Plus you don't get all those nasty chemicals on your clothes (score).
P.P.S. Are you wondering now what's in your conventional brand dryer sheets? Hint: They aren't vegetarian (even if you aren't a vegetarian, that's gross.)


And since this is technically a baby blog. Here's some baby for ya. Doing what he does best...clapping. He's pretty proud of himself basically all the time.


xoxoxo

Tuesday, June 12

DIY: How To Fix a Cracked Mirror

Forget the bad luck associated with broken mirrors. It may just be the best thing that ever happened to you. The other day, I was walking around TJMaxx when I spotted a large mirror that would work perfectly in our living room. Then I saw the huge crack. At first I was disappointed and then I decided to check the price...$3.50!! For a $60 mirror! This was a sign. Without any idea what I would do with it, I lugged the mirror to the checkout and brought it home (Tom was with me, I don't think I could have handled the huge mirror, Carter in his stroller and my other purchases all at once--and there are always other purchases at TJMaxx).

This is the mirror in its cracked state:

how to cover a crack in mirror

how to fix a crack in a mirror

I got home, brainstormed a bit, and decided to cover the crack with kitchen backsplash tiles. Genius! I drove to Home Depot with my sister and her roommate (Home Depot is more fun with friends). Let me just take a second right here to tell you that I LOVE the smell of Home Depot. I always have. For years and years I've been saying Yankee Candle should come out with a Home Depot scent. Well, my prayers have been answered because they just came out with a saw dust/wood scented called 2x4! Finally!! (P.S. that idea was all me).

So we're in Home Depot in the backsplash tile aisle (rhyme, score) and I found the most perfect tiles ever.

how to cover crack in a mirror

I also picked up some clear silicone to adhere them to the mirror (had to ask my mom what would work best, this is what she suggested. She made her own kitchen backsplash. Maybe I'll do a post about that in the future--it's awesome).

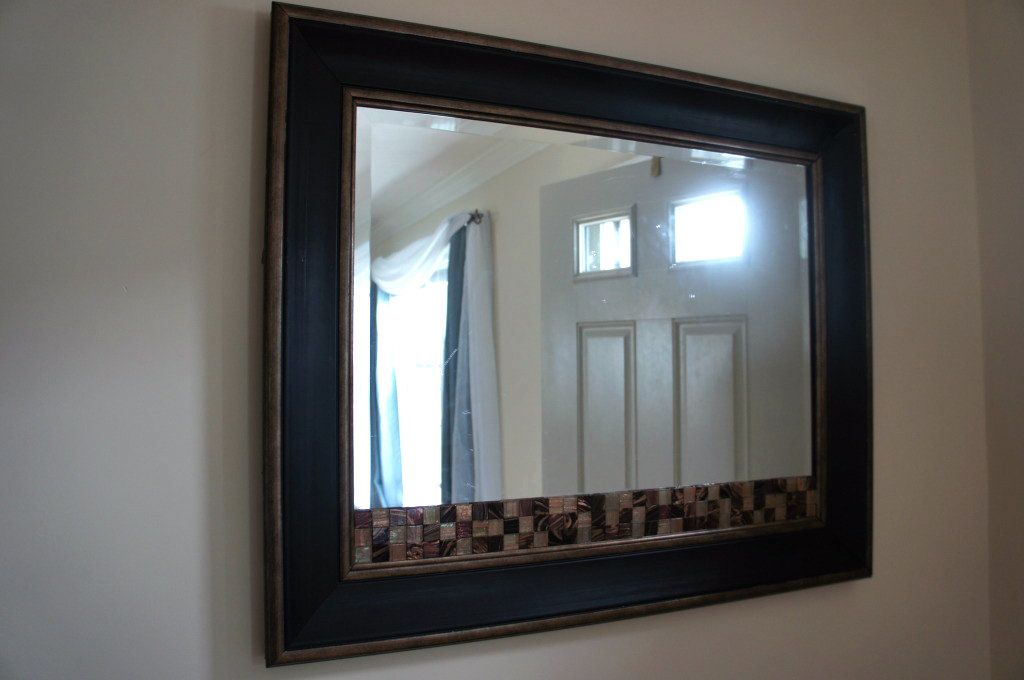
Got home, glued and glued, and came up with this:

how to fix a cracked mirror
This picture is the best I could do with my lacking photography skills. It's placed in a weird spot behind the front door, which doesn't get any light when the door is closed! (and if the door is open, I can't take a picture of it! haha)

how to fix a cracked mirror

These tiles can be put around any mirror border. I chose to only put them on the bottom of the mirror, but you could definitely go the whole way around too. You can obviously add this to a perfectly in tact mirror as well : ) And if your mirror happens to completely shatter, just cover the whole darn thing in beautiful tiles and hang it on your wall! It will look amahzing.

P.S. You want to wait a few hours after gluing the tiles to hang the mirror on the wall to make sure the silicone has time to dry. Also, if your tiles don't fit perfectly (like mine randomly, amazingly did) you'll need a little cutting tool like this one.

This entire project cost just under $13 for the mirror, the tiles and the silicone! Now that's a thrifty DIY if I've ever seen one.

P.S. You can also find this DIY at Coastal Charm's Nifty Thrifty Tuesday Link Party.

Tuesday, May 29
Do This DIY!

Friends! You must do this DIY from Blogilates on YouTube! It's for a racer back work out shirt and it is so easy and cute. I did it in about 20 minutes. You know those times when DIYs are a complete disaster, yours looks nothing like the tutorial, and you just end up frustrated with a big mess to clean up? This will not be one of those times. Promise.


I used a an old white Hanes t shirt for mine and it came out great! I'm making another one tonight with an old Celtics shirt! Woo!

Also--I have recently done two of my own DIY projects that I'll be sharing soon! I am particularly excited about one of them!!

OK, back to work!


Tuesday, March 27

DIY: Fabric Flower Wreath

So the other day, Carter and I were bored so I decided it would be a good idea to go to Michael's and get crafty. I've been wanting a springy wreath for our door for a few weeks now, and it's finally appropriate to have one (thanks, March 20th). This is what I made:


I'm sure you've seen similar wreaths all over Pinterest. I did, and I wanted one of my own. This is what I did:

1. wrapped yarn around a foam wreath form (this was the most time consuming step, by far) If you have the option to get a ball of yarn rather than the long tubey shape (is there a name for that?) go for that one because the large tubey kind doesn't fit through the hole well and I had to keep cutting long strands of yarn, which inevitably got all balled up and knotted while I was working.
2. I found some bright fake flowers in the clearance section for like $1.50 (it was a steal, I tell you)
3. I made fabric flowers using these tutorials for felt flowers. I decided to forego the felt because it is my least favorite material in the entire world (there's just something yucky about the way it feels on your fingers, I also feel this way about velvet). I thought it was fun to use fabric with flowers already on it, and I simply cut around the flowers. This was the print, it's the same as the Kissaluvs Marvels Mocha Swirl fitted diaper!


4. I glued all the prettiness the way I wanted and added a pre-made "cheerleader bow" because I don't possess the greatest bow-tying skills.

Go make one!!

Sunday, January 15

Nate Berkus: A Tribute

Source
So I just learned last night (yeah, last night, I'm a little out of the loop regarding Nate apparently) that The Nate Berkus Show is cancelled!! What will be my background show while I work during C's naps in the morning?! I had big dreams of going to be in the audience with my best friend Kelsey, but I guess I can cross that off the list.

Maybe he'll be free to decorate my house now...

I guess I'll have to rely on Pinterest for my future crafty project inspiration. I think my next post will be a Nate-inspired DIY. It seems appropriate.

Nate, you will be missed {at least by me}.

Tuesday, December 27

Christmas Happenings


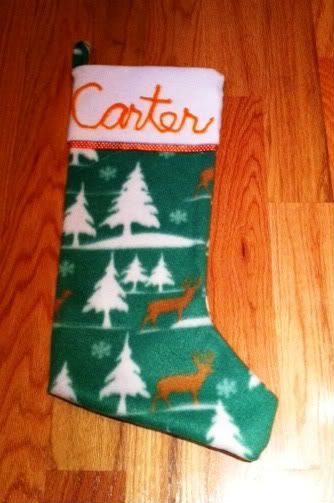
I decided to get crafty and make Carter's stocking. I had trouble finding one in stores that wasn't obviously baby-ish. I want him to be able to use the same one every year for a while. It came out a little not-round on the bottom because instead of just sewing I used fabric glue too because I wanted to make sure it was strong enough to hold all of his heavy stocking presents! (my sewing skills are not the best and I knew relying on them would not be a good idea). I think I'm kind of liking the not-roundness though. It's masculine. ; )

Here's a quick step-by-step of how I made it:

Supplies: fleece, felt (1 square piece from a craft store is enough), yarn, ribbon, scissors and sewing supplies and/or fabric glue

1. Cut out desired shape from a folded over piece of fleece (use the folded end as the back of the stocking so you don't have to glue/sew this side)
2. Sew or use fabric glue to finish the edges. Let dry (if glued).
3. Cut a piece of felt (I used white) to desired size and glue/sew along the top of the stocking and around the back. 
4. Cut a strip of fleece about 5 inches long and 1-2 inches wide to use for the loop (for hanging the stocking)
5. Sew the loop, taking care to make several stitches in order to make it strong enough to hold all the goods!
6. Use yarn and hot glue to write the name on the felt
7. Add a piece of ribbon (lace would be cute for a girl's stocking) to the edge of the felt to give it a more finished look

Good luck! Happy Sewing (or in my case, gluing!)
Tom dressed up like Santa because it was more fun than going to the old man in the mall. I got the Santa suit on a whim at JoAnn. It ended up being like $4 because it was 70% off--good buy!

Here's a little look at our Christmas fun!
Pin It button on image hover